
Create 7 custom fingerprint reader Tasker actions
Previously I did a tutorial on how to assign custom fingerprint actions and make it context dependent. You can have a look at this tutorial here. This time I will show you few different profiles that utilize this action, and make the fingerprint sensor even more useful. If you don’t have a fingerprint scanner on your phone, don’t worry, this would as well work with an onscreen button. I will show you how to create an invisible one too!
Let’s have a look at custom fingerprint actions.
Chrome – send the web page to another device (upgraded)
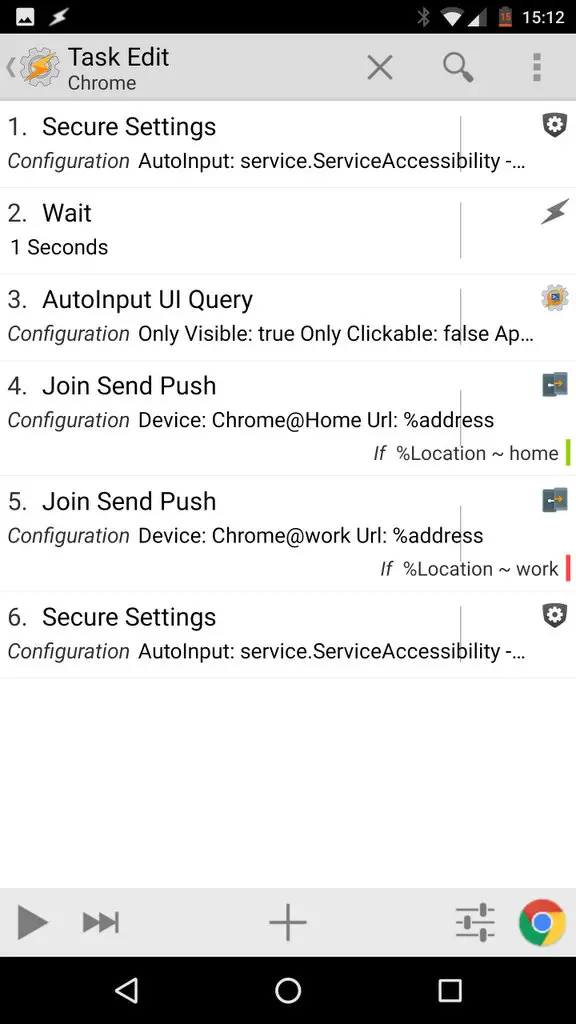
This is an iteration, so it’s bound to be better. While the profile alone does exactly the same thing, it will cast the page to the selected PC based on a WIFI connected or a dialog. I also added a toggle for accessibility services for AutoInput, as these tend to slow down the Android. You can either use a WIFI connected context to pick a PC of your choice (home/work in the example) or display a dialog. In both examples, I have added Secure Settings accessibility toggle as A1 and last action. If you struggle to get the Secure Settings working look at this solution or check the run shell options from here.
WIFI connected
 Unless you can get the location values from another profile, you will need to create two additional profiles. One will set the variable %Location to home, another to work. Create the profile, WIFI connected, fill in your home SSID, and link the task which will set the variable %Location to home. Do the same for the work WIFI.
Now that we have this ready we can simply add an IF condition to Join Push action. A push to the correct device will be issued depending on our %Location variable.
Profile: Connected Home
	State: Wifi Connected [ SSID:FASTBERRY/SLOWFROG MAC:* IP:* ]
Enter: Connected Home
	A1: Variable Set [ Name:%Location To:home Do Maths:Off Append:Off ]

Profile: Connected Work
	State: Wifi Connected [ SSID:ITC-STAFF MAC:* IP:* ]
Enter: Connected Work
	A1: Variable Set [ Name:%Location To:work Do Maths:Off Append:Off ]

Profile: Chrome On PC
	Application: Chrome
	State: Variable Value [ %FingerScanned eq 1 ]
Enter: Chrome
	A1: Secure Settings [ Configuration:AutoInput: service.ServiceAccessibility - Enabled Timeout (Seconds):0 ]
	A2: Wait [ MS:0 Seconds:1 Minutes:0 Hours:0 Days:0 ]
	A3: AutoInput UI Query [ Configuration:Only Visible: true
Only Clickable: false
App Package: com.android.chrome
Check Screen State: false
Text: ((?<=http:\/\/|https:\/\/|https:\/\/www.|http:\/\/www.|www.))?.*
Regex: true
Variables: address Timeout (Seconds):20 ]
	A4: Join Send Push [ Configuration:Device: Chrome@Home
Url: %address Timeout (Seconds):60 ] If [ %Location ~ home ]
	A5: Join Send Push [ Configuration:Device: Chrome@work
Url: %address Timeout (Seconds):60 ] If [ %Location ~ work ]
	A6: Secure Settings [ Configuration:AutoInput: service.ServiceAccessibility - Disabled Timeout (Seconds):0 ]
Dialog
 If you have multiple PC in the single network, perhaps a dialog would be a better option for you. I’m going to use AutoTools to generate a dialog which will consist names of the PCs I can cast the web page to. Once clicked – the website will be sent. If you are going to use just the dialog, you don’t need to recreate the profiles from above. All you need to do is add the AutoTools Dialog action to your task. Populate the names with your options and assign commands to each option. These commands will be stored in a variable %atcommand. Once pressed, the variable will be set, and we can trigger the correct Join Push action. Each Join Push action will have a match IF condition (%atcommand ~ home or work etc).
Profile: Chrome On PC
	Application: Chrome
	State: Variable Value [ %FingerScanned eq 1 ]
Enter: Chrome Dialog
	A1: Secure Settings [ Configuration:AutoInput: service.ServiceAccessibility - Enabled Timeout (Seconds):0 ]
	A2: Wait [ MS:0 Seconds:1 Minutes:0 Hours:0 Days:0 ]
	A3: AutoInput UI Query [ Configuration:Only Visible: true
Only Clickable: false
App Package: com.android.chrome
Check Screen State: false
Text: ((?<=http:\/\/|https:\/\/|https:\/\/www.|http:\/\/www.|www.))?.*
Regex: true
Variables: address Timeout (Seconds):20 ]
	A4: AutoTools Dialog [ Configuration:Dialog Type: List
Title: Select your pc
Icon: android.resource://net.dinglisch.android.taskerm/hd_hardware_dock
List Type: 0
Texts: Home,Work
Text Size: 20
Image Width: 100
Commands: home,work
Dim Background: true
Top Margin: 16
Bottom Margin: 16
Bottom Buttons Top Margin: 16
Bottom Buttons Bottom Margin: 16
Close On Select: true
Separator: ,
Command Variable: atcommand
Cancelable: true
Turn Screen On: true Timeout (Seconds):60 ]
	A5: Join Send Push [ Configuration:Device: Chrome@Home
Url: %address Timeout (Seconds):60 ] If [ %atcommand ~ home ]
	A6: Join Send Push [ Configuration:Device: Chrome@work
Url: %address Timeout (Seconds):60 ] If [ %atcommand ~ work ]
	A7: Secure Settings [ Configuration:AutoInput: service.ServiceAccessibility - Disabled Timeout (Seconds):0 ]
WhatsApp – Continue on the PC
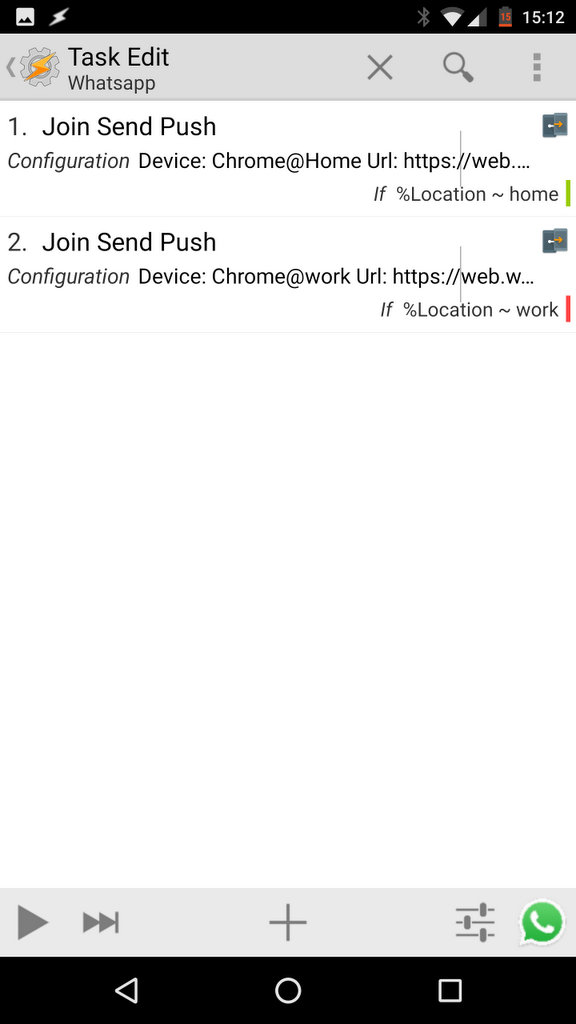 WhatsApp is great and everything, but you know that it is easier to have that heated discussion on the computer instead. Very simplistic, and yet very useful profile that will get the WhatsApp up and running on your PC so you could continue talking. If you have more than one PC, feel free to link this to a WIFI or create a dialog like we did above. If you not aware, WhatsApp has a web interface at: https://web.whatsapp.com/ use this in the URL field.
Profile: WhatsApp On PC
	State: Variable Value [ %FingerScanned eq 1 ]
	Application: WhatsApp
Enter: Whatsapp
	A1: Join Send Push [ Configuration:Device: Chrome@Home
Url: https://web.whatsapp.com/ Timeout (Seconds):60 ] If [ %Location ~ home ]
	A2: Join Send Push [ Configuration:Device: Chrome@work
Url: https://web.whatsapp.com/ Timeout (Seconds):60 ] If [ %Location ~ work ]
Facebook – Open Facebook on a PC
 In a very similar fashion, we can continue our Facebook browsing. In the same way as before link a new URL: https://www.facebook.com/ and you ready to roll. Of course feel free to link this to a WIFI or add a dialog option.
Profile: Facebook On PC
	State: Variable Value [ %FingerScanned eq 1 ]
	Application: Facebook
Enter: Facebook
	A1: Join Send Push [ Configuration:Device: Chrome@Home
Url: https://www.facebook.com/ Timeout (Seconds):60 ] If [ %Location ~ home ]
	A2: Join Send Push [ Configuration:Device: Chrome@work
Url: https://www.facebook.com/ Timeout (Seconds):60 ] If [ %Location ~ work ]
Maps – Navigate home, or to your favorite location
One click ‘Take me home’ is a very practical thing to have. When maps are open we can pass an intent and ask Google to take us home (requires home location in Google Maps, or hardcoded address in the variable). If you wish to have few favorites to choose from like work or Las Vegas, we can also link a dialog.
Navigate Home
 With a quick press of a button an Intent action is sent. This will open the Map and set home as your destination. Simple!
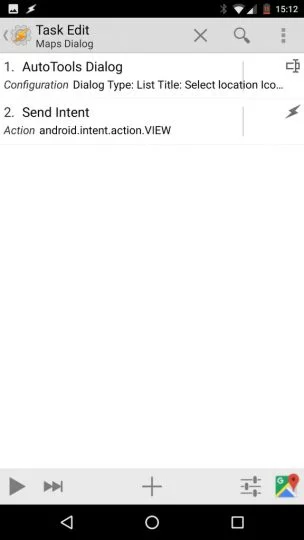
Profile: Maps Go Home
	State: Variable Value [ %FingerScanned eq 1 ]
	Application: Maps
Enter: Maps
	A1: Send Intent [ Action:android.intent.action.VIEW Cat:None Mime Type: Data:google.navigation:q=home Extra: Extra: Extra: Package: Class: Target:Activity ]
Favorite Locations
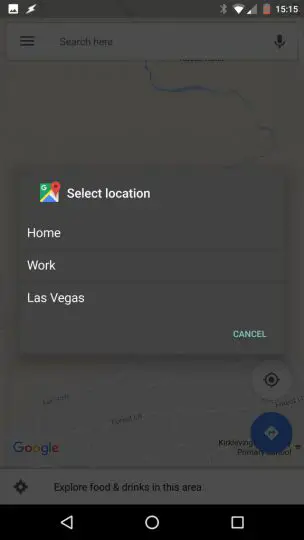
Create a dialog with AutoTools, and fill in a list of locations. You can use places like home or work, cities or specific addresses. List them separated with commas. The AutoTools dialog will populate the variable %attext when the option is pressed. This option will be passed over to the intent, in the data field: google.navigation:q=%attext . The intent: android.intent.action.VIEW will take you to your destination.
Profile: Maps Go Home
	State: Variable Value [ %FingerScanned eq 1 ]
	Application: Maps
Enter: Maps Dialog
	A1: AutoTools Dialog [ Configuration:Dialog Type: List
Title: Select location
Icon: app-icon:com.google.android.apps.maps
List Type: 0
Texts: Home,Work,Las Vegas
Text Size: 20
Image Width: 100
Dim Background: true
Top Margin: 16
Bottom Margin: 16
Bottom Buttons Top Margin: 16
Bottom Buttons Bottom Margin: 16
Close On Select: true
Separator: ,
Command Variable: atcommand
Cancelable: true
Turn Screen On: true Timeout (Seconds):60 ]
	A2: Send Intent [ Action:android.intent.action.VIEW Cat:None Mime Type: Data:google.navigation:q=%attext Extra: Extra: Extra: Package: Class: Target:Activity ]
Hangouts – Quick reply templates
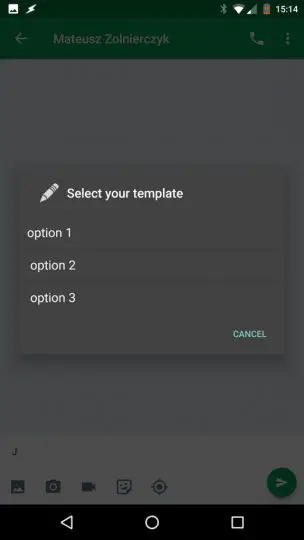

I know I seem to love the AutoTools Dialog action, but it is one of the most useful actions in my opinion. This time we will set the clipboard with a quick response template. Once the selection is made, you can paste your text message or reply in seconds. No need for typing.
To create an array, use Variable Set and list your options separated by the comma. Perform Variable split by the comma and you have a handsome looking array! We will use this array to store our templates in. Make sure it is a global array (contains upper case letter in the name) as local arrays will disappear. You can modify the array later as well. The AutoTools Dialog will take the %Templates() array in the text field and will populate your list with options. All you need to do now is use Set Clipboard action to store the value of %attext. I kept the array created actions for you in the description. Once you have an array you can delete A1 and A2 actions.
Profile: Hangout Template
	State: Variable Value [ %FingerScanned eq 1 ]
	Application: Hangouts
Enter: Hangout (16)
	A1: [X] Variable Set [ Name:%Templates To:option 1, option 2, option 3 Do Maths:Off Append:Off ]
	A2: [X] Variable Split [ Name:%Templates Splitter:, Delete Base:Off ]
	A3: AutoTools Dialog [ Configuration:Dialog Type: List
Title: Select your template
Icon: android.resource://net.dinglisch.android.taskerm/hd_content_edit
List Type: 0
Texts: %Templates()
Text Size: 20
Image Width: 100
Dim Background: true
Top Margin: 16
Bottom Margin: 16
Bottom Buttons Top Margin: 16
Bottom Buttons Bottom Margin: 16
Close On Select: true
Separator: ,
Command Variable: atcommand
Cancelable: true
Turn Screen On: true Timeout (Seconds):60 ]
	A4: Set Clipboard [ Text:%attext Add:Off ]
	A5: Flash [ Text:Clipboard set to: %attext Long:On ]
Camera – Delayed shutter
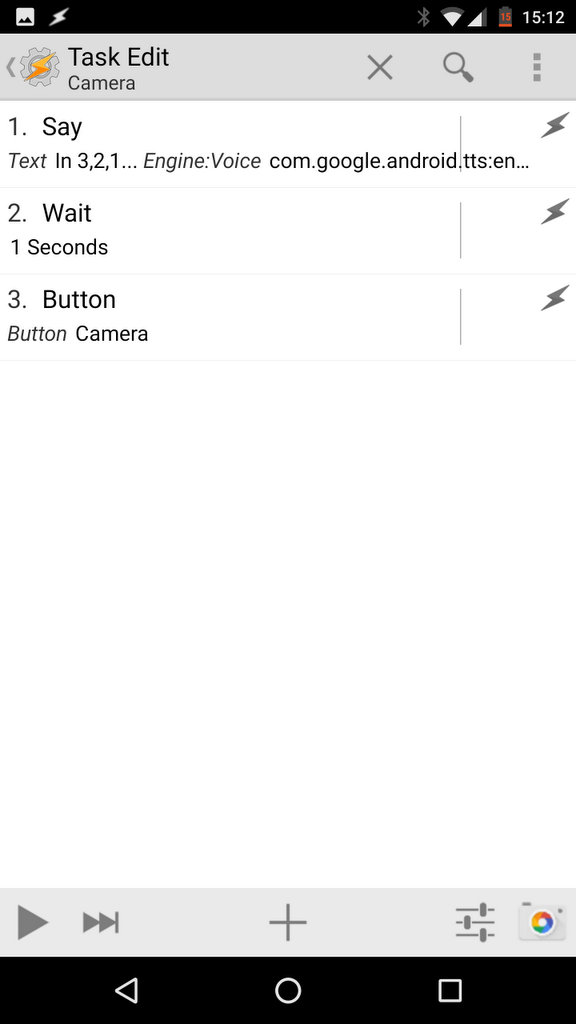 I always find uncomfortable to use the camera for selfies. Scanning your finger perhaps is not the greatest option, however, you can set the camera to a timer, and get your hand in position. This gives you the extra reach needed for that ultimate selfie.
To give ourselves a warning, the Android lady will count down for us with the action Say. After this – use action Button – Camera to take the picture with the main camera. No need to play with the timers or reaching out for a button.
Profile: Camera Seflie Main
	State: Variable Value [ %FingerScanned eq 1 ]
	Application: Camera
Enter: Camera
	A1: Say [ Text:In 3,2,1... Engine:Voice:com.google.android.tts:eng-gbr Stream:2 Pitch:6 Speed:6 Respect Audio Focus:On Network:On Continue Task Immediately:Off ]
	A2: Wait [ MS:0 Seconds:1 Minutes:0 Hours:0 Days:0 ]
	A3: Button [ Button:Camera ]
YouTube – Cast to PC
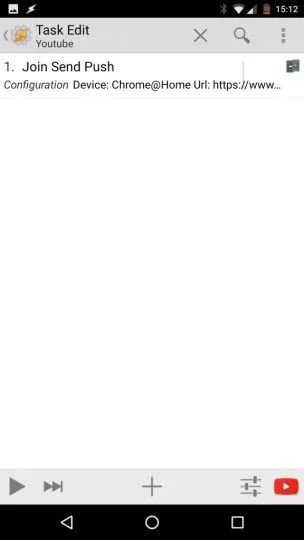
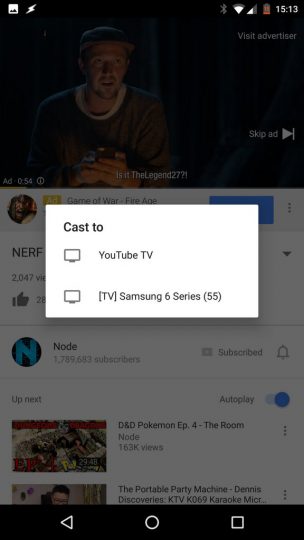
I always found this annoying, if you have a smart TV – casting the YouTube video to PC is very difficult. Unless your PC has the YouTube page open in a TV mode, the cast option is not possible. We can enable the option using the scanner. This is yet another simple profile, but so useful. Open Join Push URL page: https://www.youtube.com/tv on your PC, and you can select the source of your cast by long pressing the cast option in the YouTube Video! So simple!
Profile: Youtube PC (21)
	State: Variable Value [ %FingerScanned eq 1 ]
	Application: YouTube
Enter: Youtube (20)
	A1: Join Send Push [ Configuration:Device: Chrome@Home
Url: https://www.youtube.com/tv Timeout (Seconds):60 ]
Conclusion – custom fingerprint actions alternatives
If you don’t have a sensor the same behavior can be reproduced with an overlay. I’m using an image added to the scene. Modifying the alpha value according to my needs. If you make an invisible scene that will act exactly the same way as scanning your finger. Place it in a fixed location, so you would know where to tap (or long tap) and execute the following: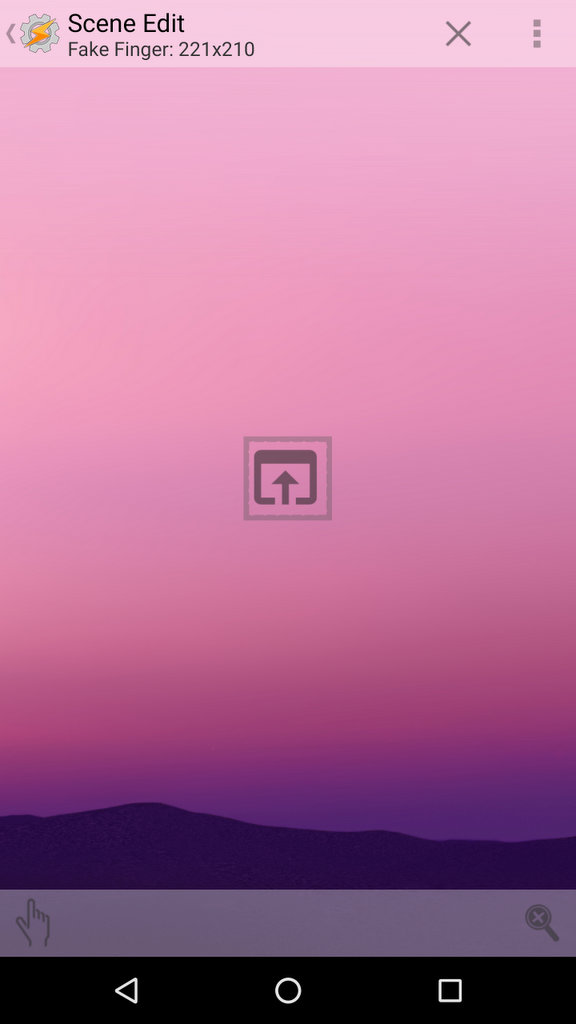
Scanned Finger
   A1: Variable Set [ Name:%FingerScanned To:1 Do Maths:Off Append:Off ]
   A2: Wait [ MS:0 Seconds:2 Minutes:0 Hours:0 Days:0 ]
   A3: Variable Set [ Name:%FingerScanned To:0 Do Maths:Off Append:Off ]
You can make the button visible, but I found it little distracting especially when watching the videos etc. Select all applications that would support the use of the button by creating a profile which will show and destroy the scene.
Profile: Fake Button
	Application: Chrome, Camera, Hangouts...
Enter: Fake Button
	A1: Create Scene [ Name:Fake Finger ]
	A2: Show Scene [ Name:Fake Finger Display As:Overlay, Blocking Horizontal Position:200 Vertical Position:100 Animation:System Show Exit Button:On Continue Task Immediately:On ]

Exit: Fake Button-
	A1: Destroy Scene [ Name:Fake Finger ]
I’m keen to see what other uses you could come up with. Let me know and I will update this post.
You will need:
Android ver: 6+ (Used 7.0),
Apps: Join (or AutoRemote), Fingerprint scanner tools (Tasker support need to be unlocked)
Plugin: AutoInput AutoTools Secure Settings
Needs: Fingerprint Reader
You can find the project file to download here.
