


AutoTools seem to be getting more and more features making my AutoTools guide feel outdated! I will try to get that post updated to reflect the changes. The recent tutorial from Joao shows us how to create the side launch menu. A cool stuff, but I don’t think I would use this personally, besides Joao wrote the tutorial himself. Go check it out here.

Tasker – Clipboard Manager

While you could have a floating icon, I like the swipe gesture instead. In addition to this, Tasker – Clipboard Manager has a very small impact on your phone performance as the profile can be limited to work with certain apps only. In the video, you can see me linking the clipboard menu to the Google+ and Pages Manager. Bear in mind that the collection of the clipboards happens constantly.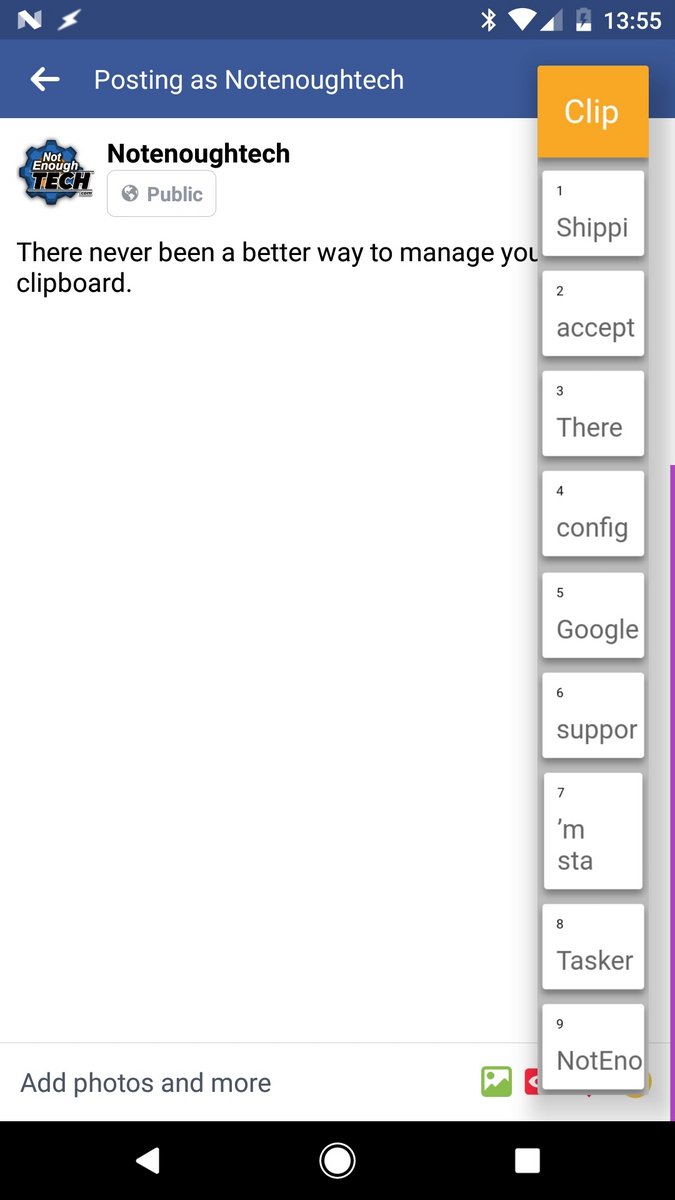
The project also does not interfere with Join. If you use this app, then you can also share the selected clipboards with other devices. For this project, I’m using AutoTools WebScreens action so make sure you have the plugin installed. Anything else is just stock Tasker. Access to the clipboard manager is driven by the apps. I don’t need this when I’m watching YouTube or playing a game, therefore, there is a profile that enables the swipe functionality.
PROFILE – Apps with Clipboard
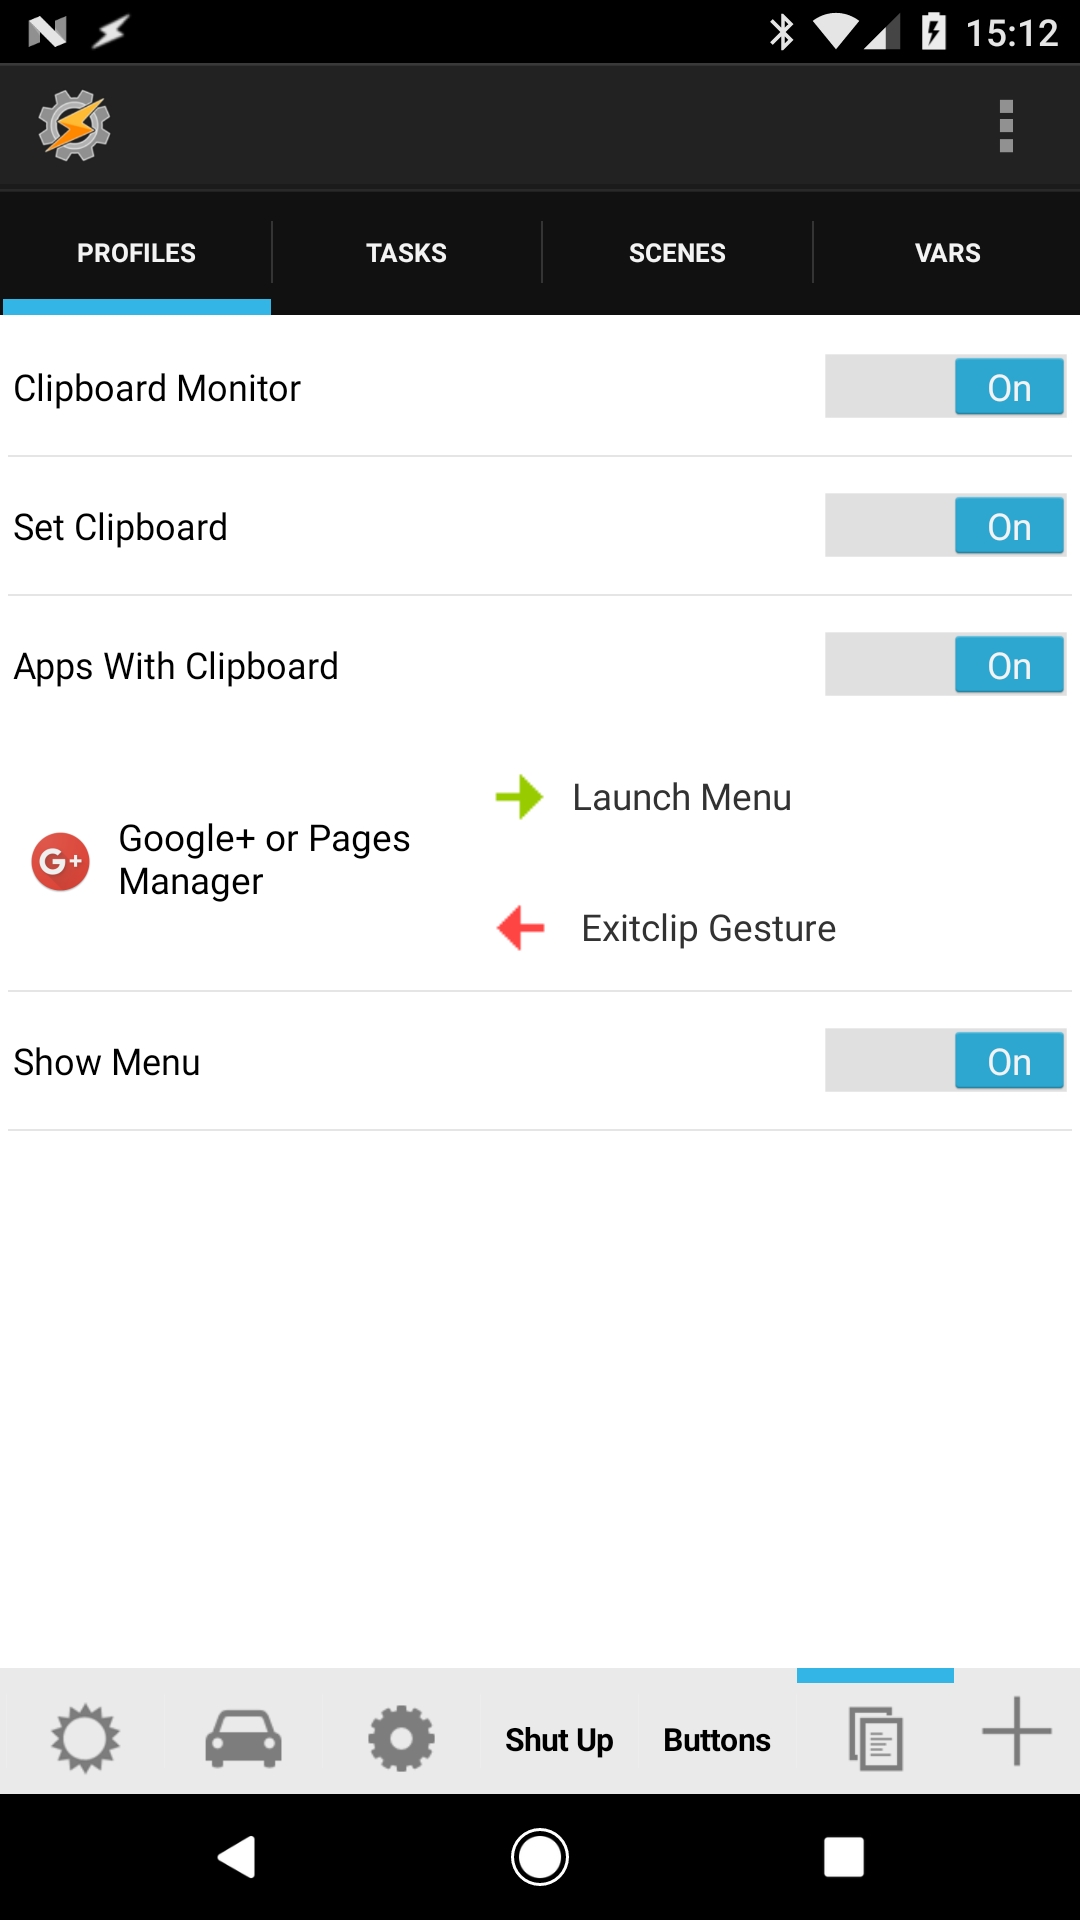
Profile: Apps With Clipboard
	Restore: no
	Application: Google+ or Pages Manager
Enter: Launch Menu
	A1: AutoTools Web Screen [ Configuration:Screen Preset: Swipe
		Display Mode: Overlay
		Close Overlay ID: Swipe
		Source: /storage/emulated/0/AutoTools/swipe/page.html
		Toast Duration: 5000
		Background Color: #00CE93D8
		Width: 10
		Height: 400
		Gravity: Bottom Right
		Animation: Slide In From Bottom
		Overlay Id: Swipe
		Show Duration: 500
		Hide Duration: 250
		Drag: Not Draggable
		Hide Dialog Shadow: true
		Inject In Header: var a=1;
		Commands Prefix: swipe
		Swipe Left: left
		Swipe Right: right
		Swipe Up: up
		Swipe Down: down
		Border Color: #AB47BC
		Border Witdh: 3
		Border Side: Right Timeout (Seconds):30 ]

Exit: Exit Clip Gesture
	A1: AutoTools Web Screen [ Configuration:Screen Preset: Swipe
		Display Mode: Close
		Close Overlay ID: Swipe
		Source: /storage/emulated/0/AutoTools/swipe/page.html
		Toast Duration: 5000
		Background Color: #00CE93D8
		Width: 10
		Height: 400
		Gravity: Bottom Right
		Animation: Slide In From Bottom
		Show Duration: 500
		Hide Duration: 250
		Drag: Not Draggable
		Hide Dialog Shadow: true
		Inject In Header: var a=1;
		Commands Prefix: swipe
		Swipe Left: left
		Swipe Right: right
		Swipe Up: up
		Swipe Down: down
		Border Color: #AB47BC
		Border Witdh: 3
		Border Side: Right Timeout (Seconds):30 ]
[/tab] [/tabs] Select the applications you want to enable in the context, then create a Task called Launch Menu. This task will enable the WebScreen swipe in the Tasker Project – Clipboard manager.
TASK – Launch Menu
In the AutoTools WebScreen option import a Screen preset (swipe) and remove all commands but ‘right’ in the commands section of the setup page.
Set up Windows settings to your preference. I have the Gravity set to Bottom Right, Width is 10 and Height are ‘fill’.
TASK – Exit Clip Gesture
We need to disable the gesture when it’s not needed. Add an exit task and create another WebScreens action. This time use the Display Mode to set ‘close’ action. This will terminate the WebScreen and swipe recognition.
PROFILE – Show Menu
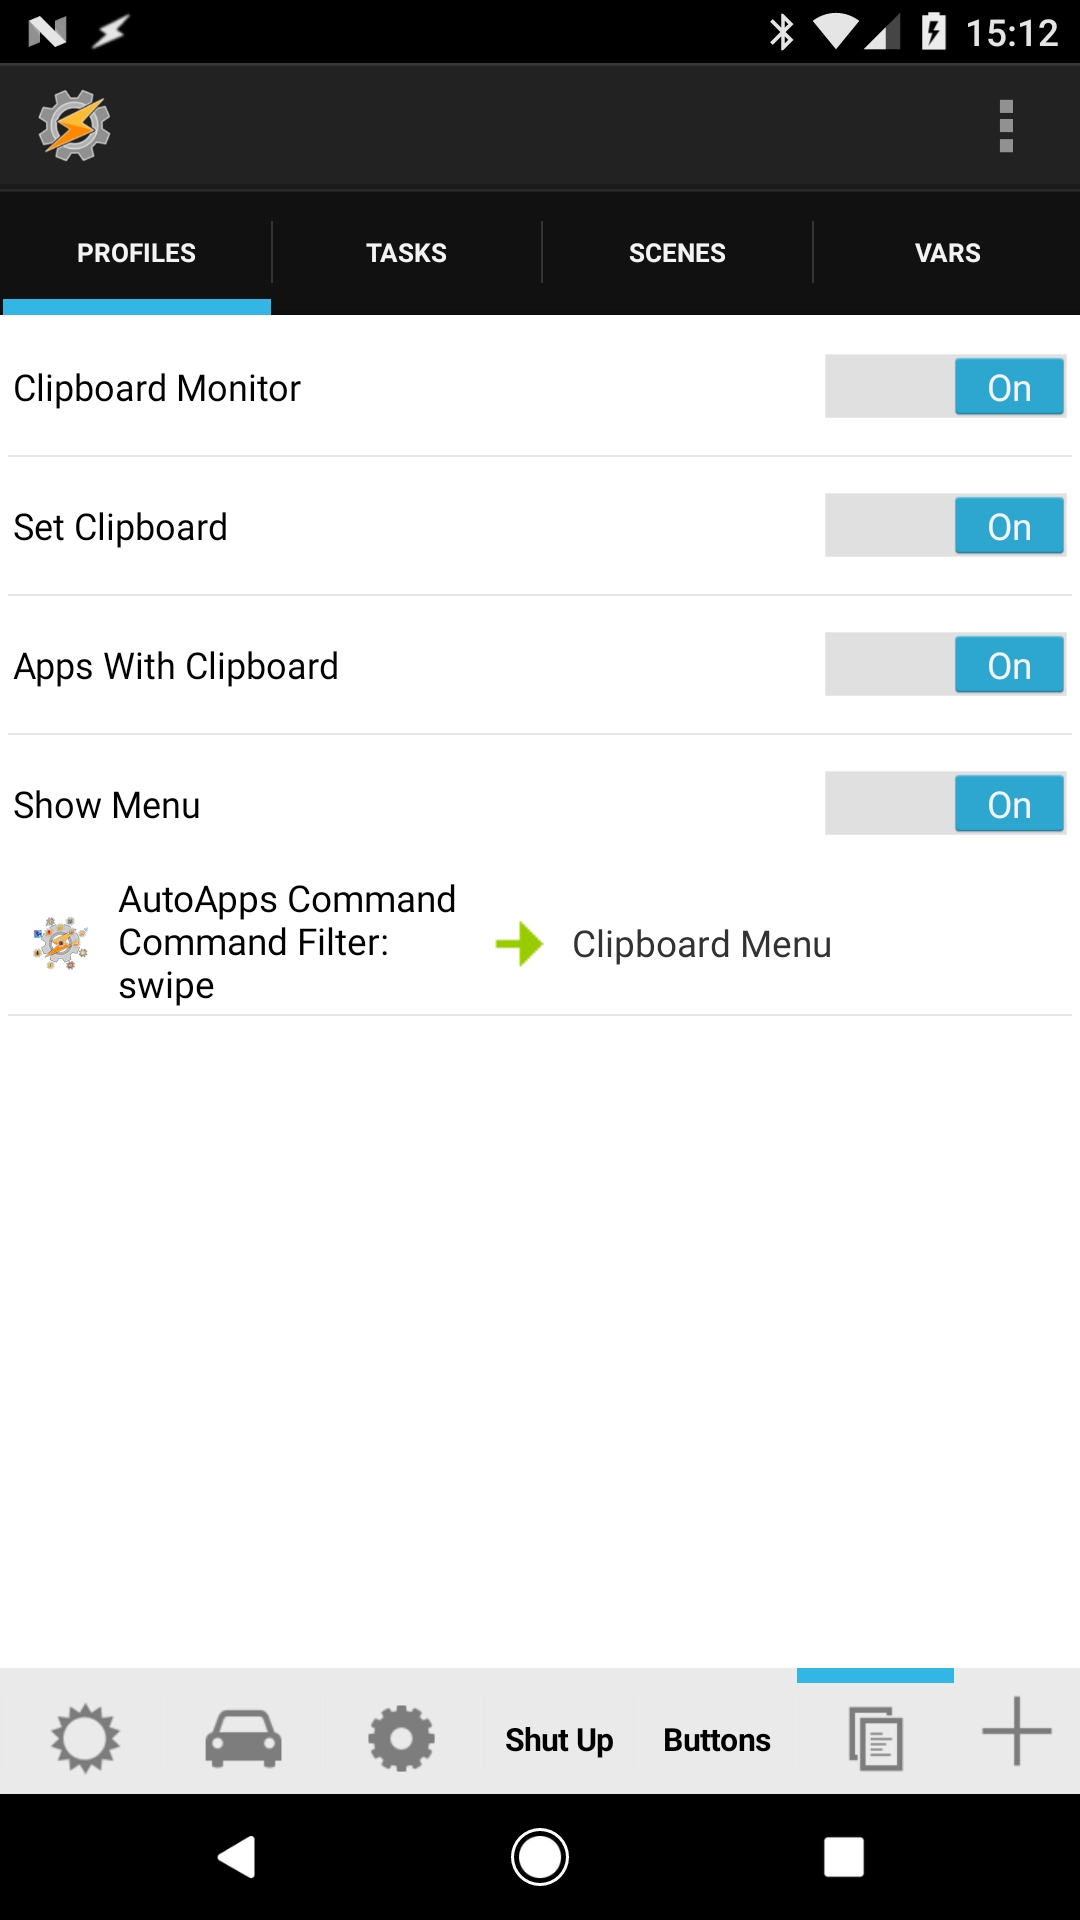
Profile: Show Menu
	Event: AutoApps Command [ Configuration:Command Filter: swipe ]
Enter: Clipboard Menu
	A1: AutoTools Web Screen [ Configuration:Screen Preset: Card List
		Display Mode: Dialog
		Source: /storage/emulated/0/AutoTools/cardlist/page.html
		Toast Duration: 5000
		Width: 100
		Height: fill
		Gravity: Bottom Right
		Animation: Slide In From Top
		Show Duration: 500
		Hide Duration: 250
		Close On Command: true
		Wait For Command: true
		Title: Clip
		Card Titles: %ClipPosition()
		Card Subtext Left: %ClipAbrev()
		Card Commands: %ClipPosition()
		Commands Prefix: clipboard
		Background Color: #BDBDBD
		Accent Color: #F9A825
		Max Card Width: 90%
		Max Image Height: 75
		Title Text Size: 5
		Card Padding: 0
		Card Alignment: Center
		Item Separator: , Timeout (Seconds):30 ]
[/tab] [/tabs]
TASK – Clipboard Menu
The layout has been ‘borrowed’ from Joao’s tutorial. I liked how the side launcher looked and there was no point of reinventing the wheel again. Obviously, the variables used in that WebScreen will be different but the layout is pretty much the same.
Add an AutoTools Web Screen action and select the Card List preset, Under Window Settings set
- Width to 100
- Height to fill
- Gravity to Bottom Right
Under Command Options enable both Close On Command and Wait For Command, Under Cards set
- Card Titles to %ClipPosition() (will contain numbers from 1-9)
- Card Subtexts to %ClipAbrev() (contains short snippet)
- Card Commands to %ClipPosition() (used to identify the press)
- Commands prefix to clipboard
- Max Card Width and Min Card Width to 90%
- Max Image Height to 75
- Title Text Size to 5
Feel free to modify the look of the notification. Bear in mind that opening the WebScreen without the next step won’t give you any previews.
TASK – array numbers
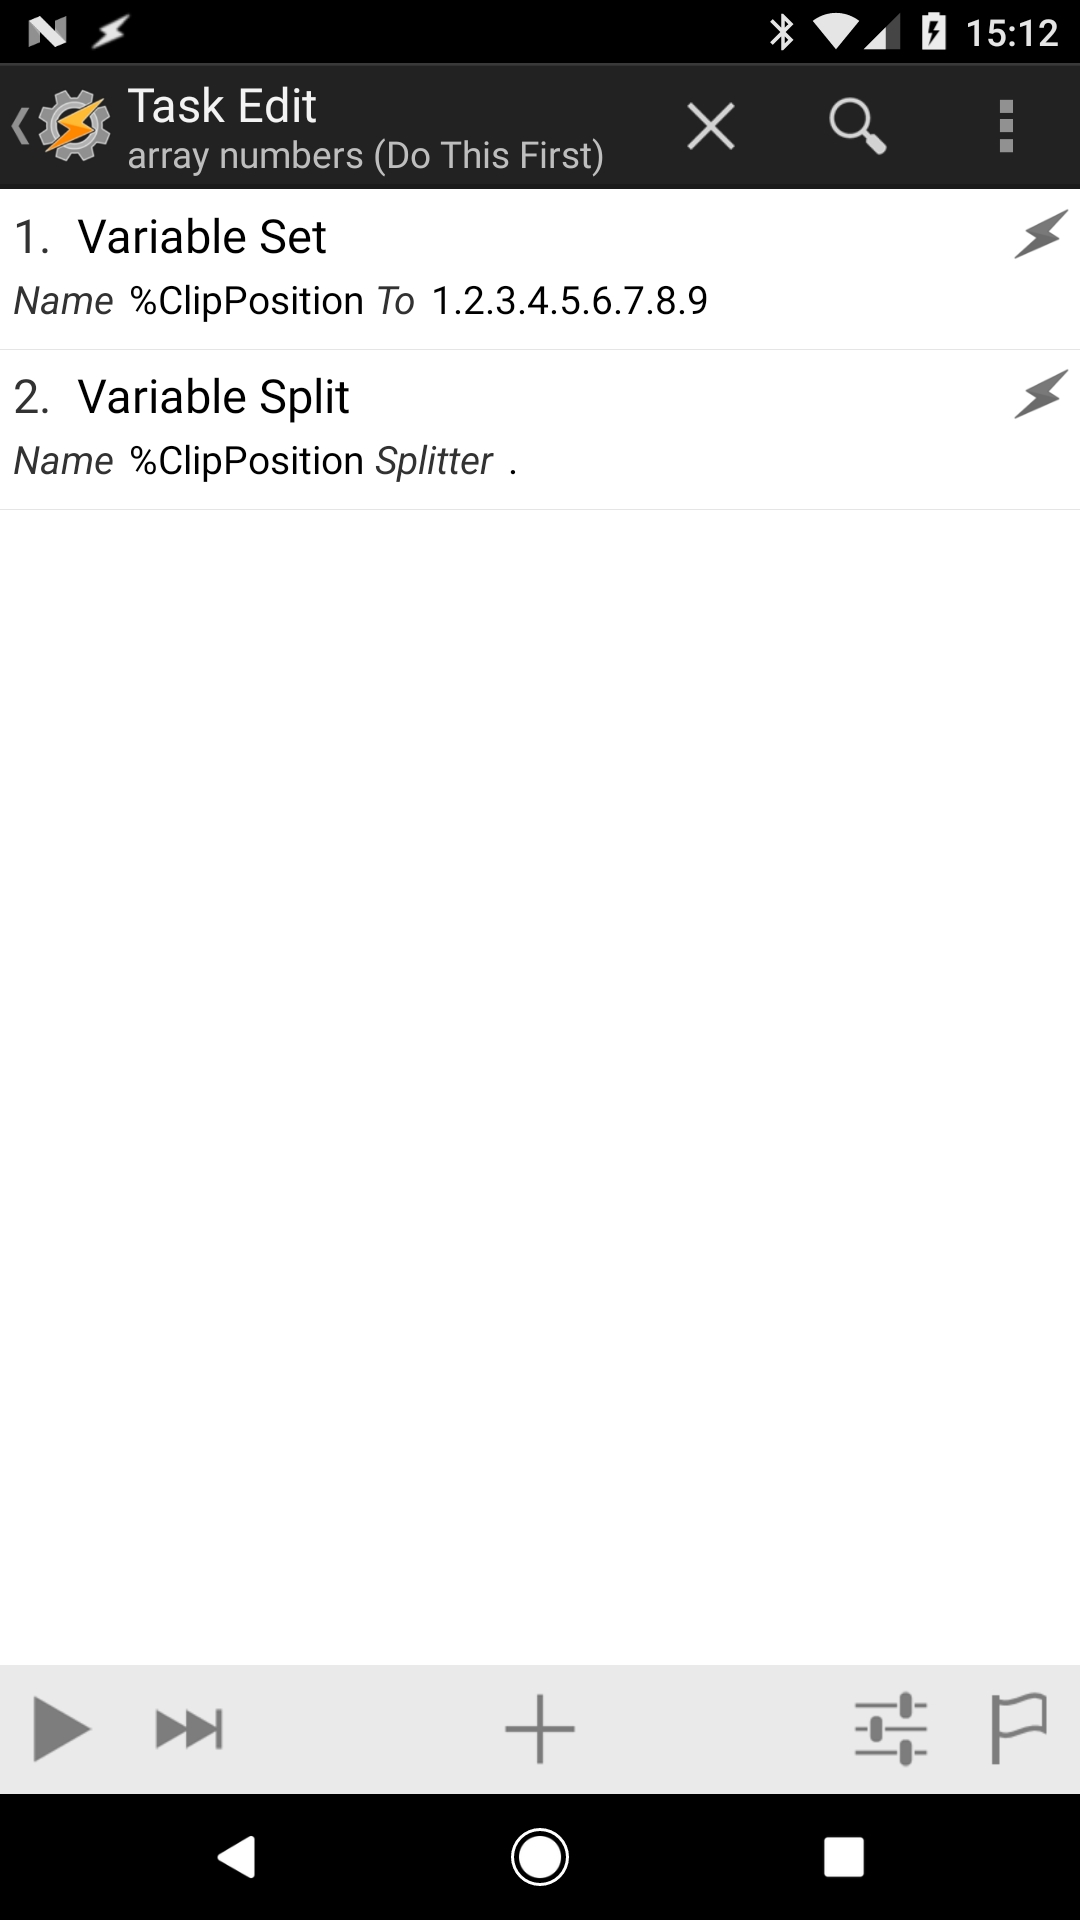
array numbers
	A1: Variable Set [ Name:%ClipPosition To:1.2.3.4.5.6.7.8.9
            Recurse Variables:Off Do Maths:Off Append:Off ]
	A2: Variable Split [ Name:%ClipPosition Splitter:. Delete Base:Off ]
[/tab]
[/tabs]
Create this task then generate the array. This will create the global array.
PROFILE – Clipboard Monitor
Profile: Clipboard Monitor
	Event: Variable Set [ Variable:%CLIP Value:* User Variables Only:Off ]
Enter: Clipboard Manager
	A1: Variable Section [ Name:%CLIP From:1 Length:6 Adapt To Fit:On Store Result In:%abrev ]
	A2: Array Push [ Variable Array:%ClipboardArray Position:1 Value:%CLIP Fill Spaces:Off ]
	A3: Array Push [ Variable Array:%ClipAbrev Position:1 Value:%abrev Fill Spaces:On ]
	A4: Array Process [ Variable Array:%ClipAbrev Type:Remove Duplicates ]
	A5: Array Process [ Variable Array:%ClipboardArray Type:Remove Duplicates ]
	A6: Array Process [ Variable Array:%ClipboardArray Type:Squash ]
	A7: Array Process [ Variable Array:%ClipAbrev Type:Squash ]
	A8: Array Pop [ Variable Array:%ClipAbrev Position:10 To Var: ] If [ %ClipAbrev(#) eq 10 ]
	A9: Array Pop [ Variable Array:%ClipboardArray Position:10 To Var: ] If [ %ClipboardArray(#) eq 10 ]
[/tab] [/tabs]
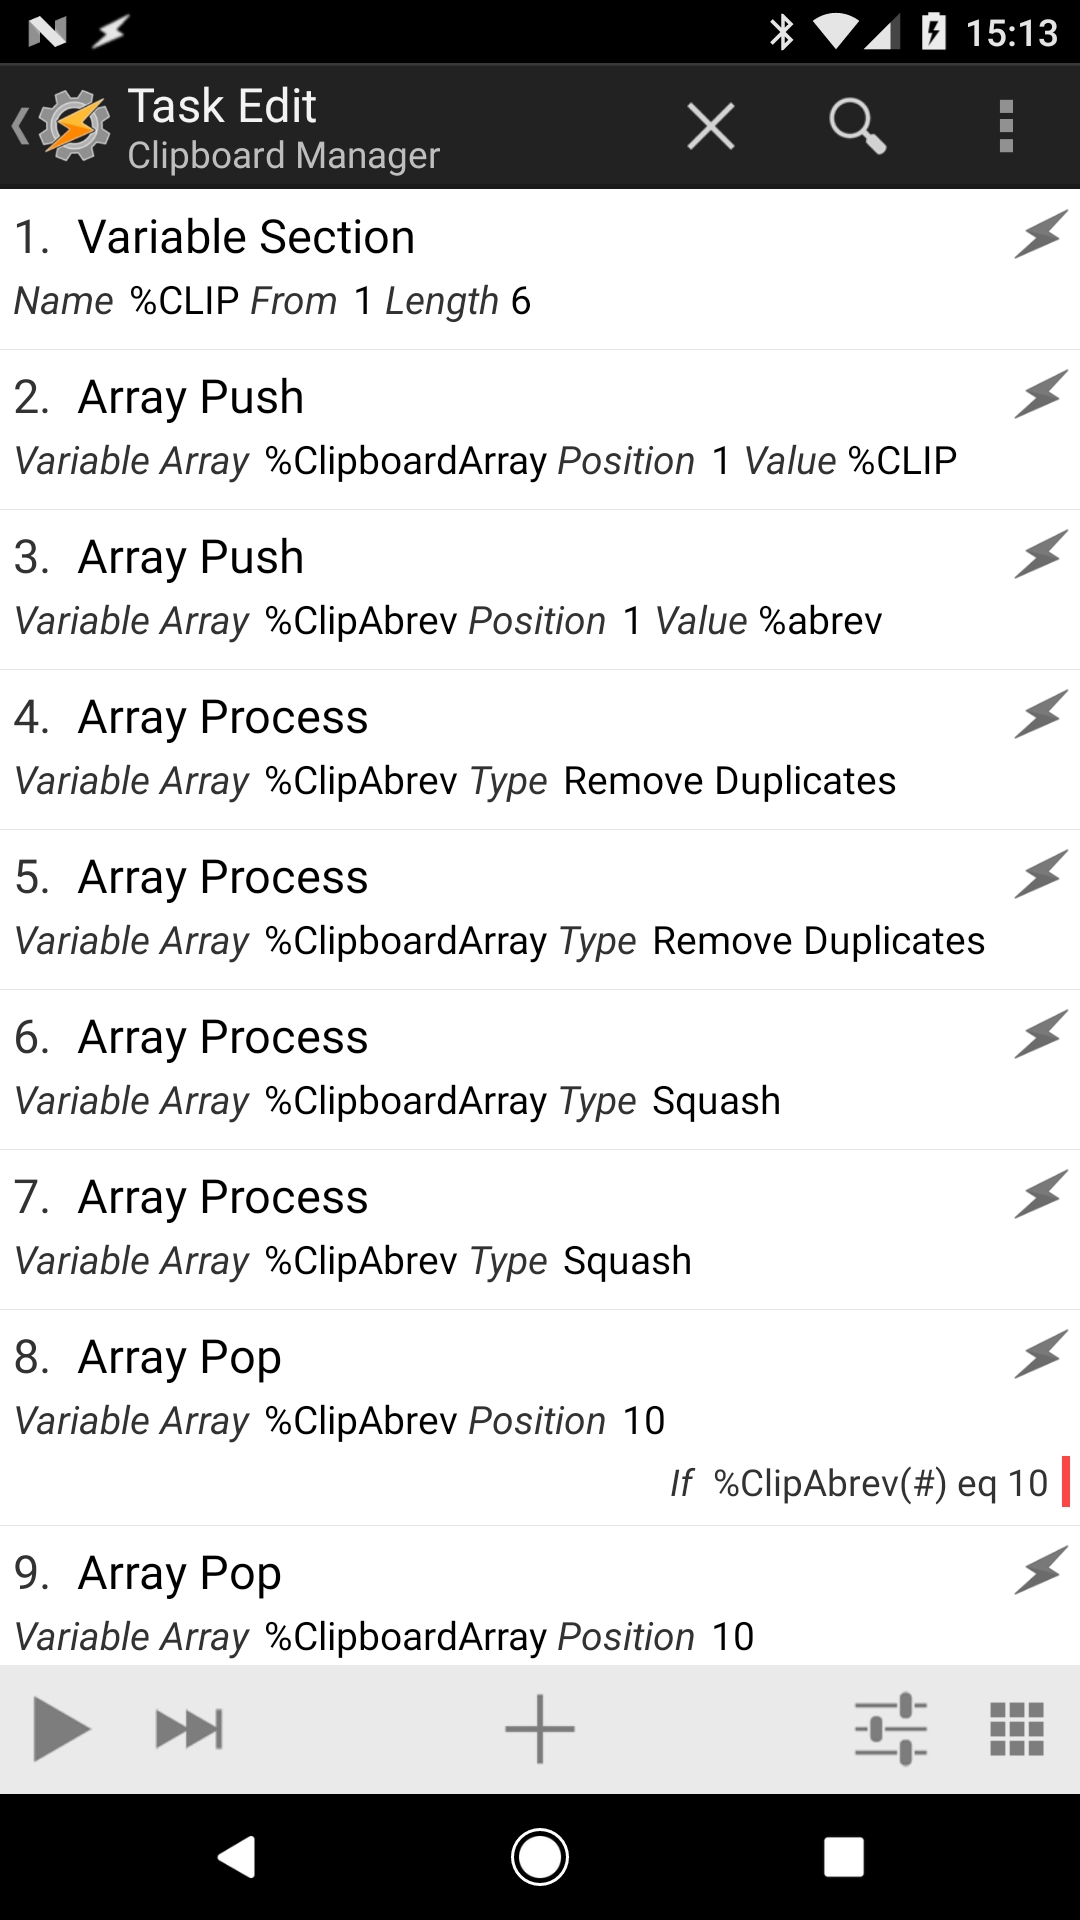
TASK – Clipboard Manager
Our clipboard content is stored in the %ClipboardArray() – each time a new clipboard is saved an Array Push (A2) action moves it to the 1st position of the array. Because I don’t want an entire text to be visible on the side menu, I created another array %ClipAbrev() (A3) that will store first X letters of the clipboard. To shorten the clipboard use (A1) Variable Selection and limit numbers of characters to ie 6 (make sure that Adapt to Fit is checked) store that value in the local %abrev variable which is used to populate the (A3) Array Push action.
Now that we have the clipboard collection ready we have to clean up the mess. The array will collect all the clipboards. This means that when we pick a clipboard from our side menu, it will collect the new value and assign it as a duplicate to the menu. Therefore each time we save a clipboard – I want to remove duplicate entries (A4,A5) and remove empty spaces (A6,A7). Array process actions are performed on both %Clipboard Array() and %ClipAbrev.
Lastly, I want my menu to contain 9 entries only. You can have more, but I find that the 9 menus fit great on my screen without scrolling. To do this – use Array Pop (A8,A9) and remove the 10th position. Do this ONLY if the array contains 10 elements. Otherwise, the last element is removed. We achieve this by checking if number of elements %ClipboardArray(#) = 10.
PROFILE – Set Clipboard
[tabs tab1=”PROFILE – Set Clipboard”]
[tab id=1]
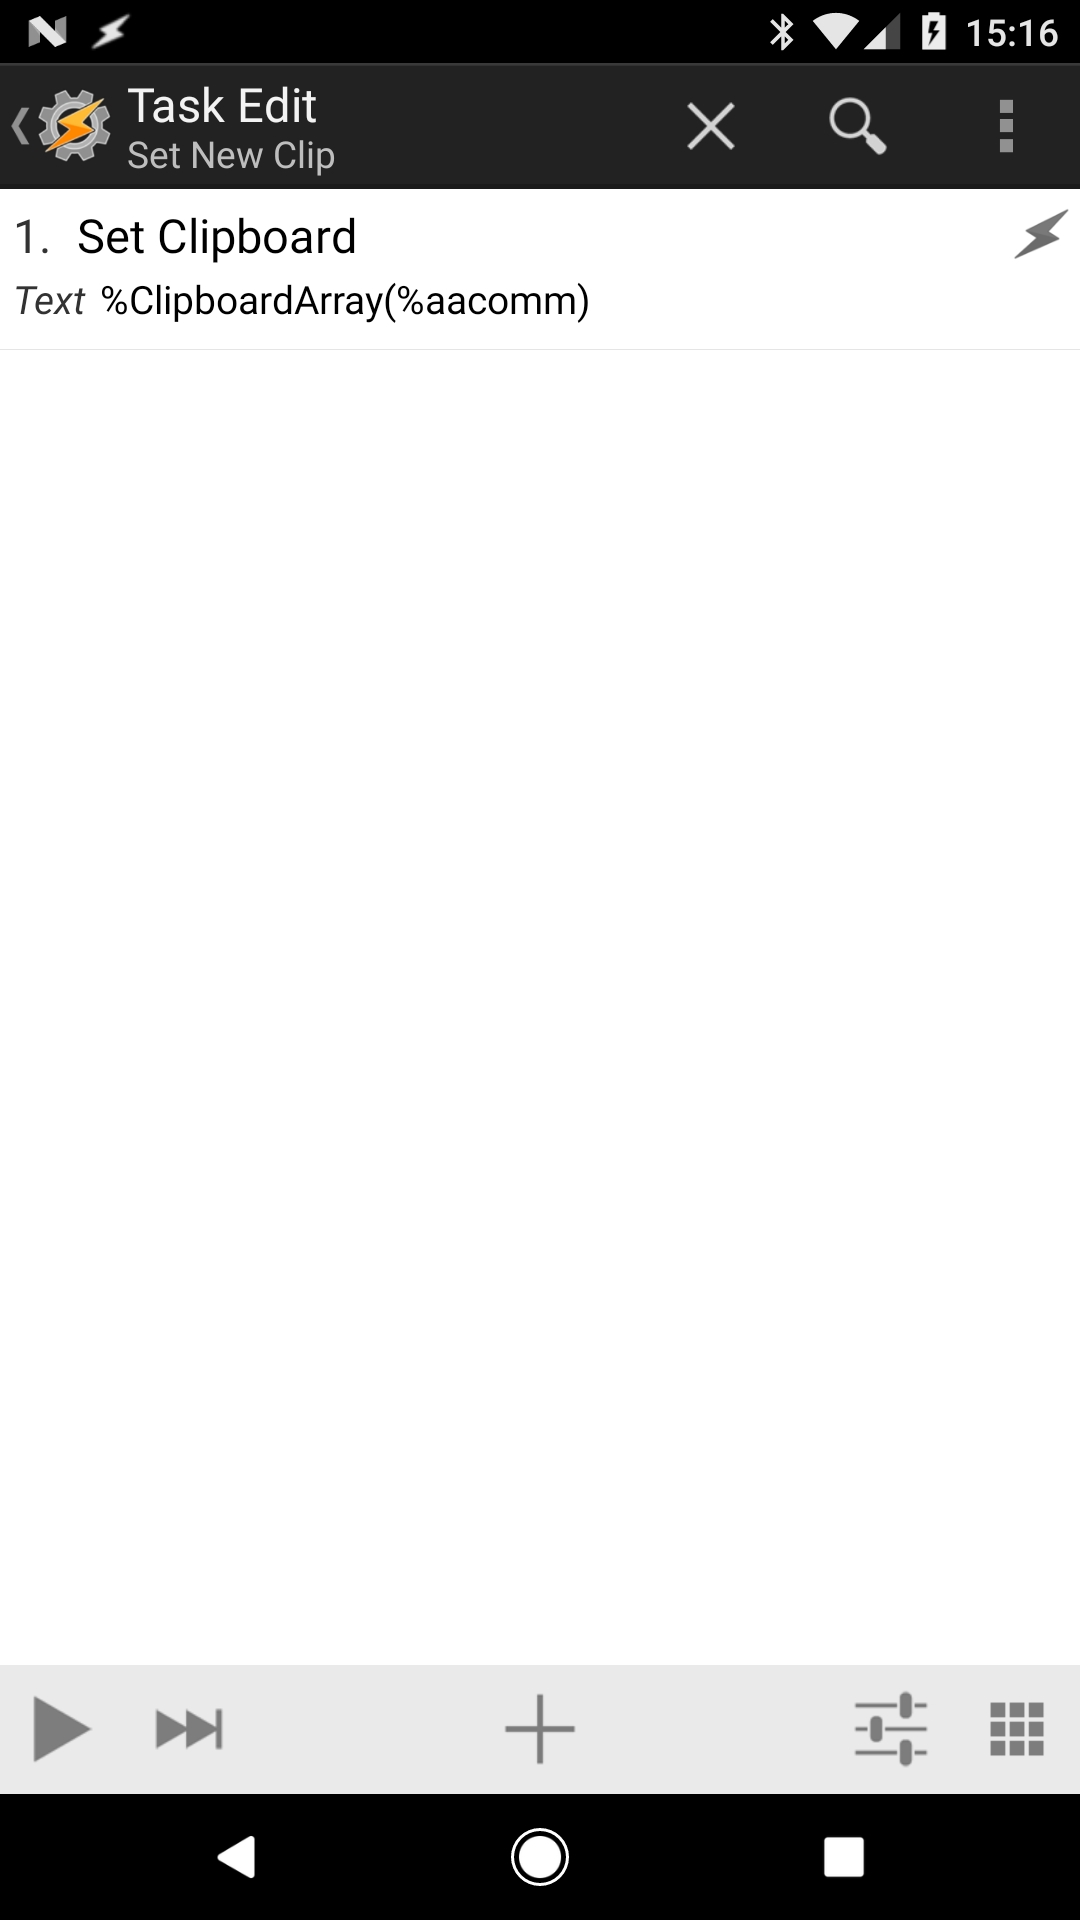
Profile: Set Clipboard
	Event: AutoApps Command [ Configuration:Command Filter: clipboard ]
Enter: Set New Clip
	A1: Set Clipboard [ Text:%ClipboardArray(%aacomm) Add:Off ]
[/tab][/tabs]
TASK – Set New Clip
The task is very simple as well. Set clipboard to the value of the %ClipboardArray() we want to choose the element specified by the %aacomm part of the received command. So set clipboard as %ClipboardArray(%aacomm). And you are done. The Tasker Project – Clipboard Manager is completed.
The project files are available in the video description.

