
Near-Perfect AutoNotifications
Many times before, I found myself creating yet another AutoNotificaiton action in my Tasker project. Anyone using this plugin knows how versatile it can be and at the same time, how annoying it can be to fill in all these fields to make the notification look half decent. I touched on streamlining the AutoNotification messages before when using NodeRED, but the same principle can be applied to any project. It was time to create Near-Perfect AutoNotifications.
Near-perfect Autonotification
The set up created by me supports most useful fields. It can be expanded to virtually all fields available. Don’t worry, I’m not going to do all of it, but feel free to expand it out according to your needs. I’m going to show you how to use a single profile to integrate the AutoRemote and AutoApps commands in a single task.
Sending data with AutoRemote or AutoApps commands
First of all, if you want to know more how AutoRemote works – read this. I’m only going to cover a small fraction of that plugin for the purpose of the tutorial. When I started with AutoRemote, my messages between devices would look something like this:
silent notification PC wake up
While this would work, after a while my notifications had to be organised. This is where the structure of the message comes into play.
silent notification=:=PC=:=wake up
In the example above AuroRemote will split the message accordingly:
- %arcomm() = %arcomm1 = PC, %arcomm2 = wake up
- %armessage = silent notification=:=PC=:=wake up
- %arpar() = %arpar1 = silent, %arpar2 = notification
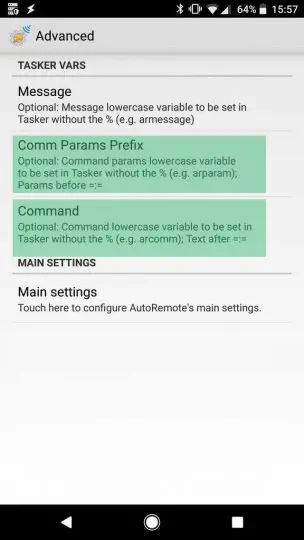 In advanced settings AutoRemote allows you to change the name of the variables: %arpar and %arcomm. To have a single task that links the commands issued by AutoRemote and AutoApps I’m going to rename the variables to: %aapar and %aacomm respectively. This way regardless of where the command has originated, the AutoNotification will process it in the same way.
- %aacomm() = %aacomm1 = PC, %aacomm2 = wake up
- %aamessage = silent notification=:=PC=:=wake up
- %aapar() = %aapar1 = silent, %aapar2 = notification
The AutoNotification
As you can see in the previous chapter the array %aapar() allows you to pass different values to the AutoNotification. For short notifications, you could use something as simple as:
notification=:=title=:=text
Each word to the right of =:= would get assigned as %aacom. Here is the list of values which are substituted by the variables:
- title (expanded as well)
- text (expanded as well)
- message ID
- priority
- launcher icon
- notification icon
- colour
- multiple buttons and actions
The proposed message format starts with the most often used values and ends with buttons. I will use the notification below as an example.
NOTIFICATION silent=:=This is the title=:=This is the text of the message that will have over 37 characters to illustrate the point=:=messageID=:=#5481D4FA=:=2=:=notification=:=notificationbig=:=button1=:=button1action=:=button2=:=button2action
Here is the layout of my notification:
In addition to the %aacomm() array, we also get a %aapar() array which contains each word to the left of =:=. You could use this neat trick to pass multiple words into a single variable.
make this silent NOTIFICATION=:=PC=:=wake up
a string like this, which reads as %aapar() = make,this,silent,NOTIFICATION could be used as:
make.this.silent NOTIFICATION=:=PC=:=wake up
and transformed into something more useful using the task below %aapar() = make this silent, NOTIFICATION
[tabs tab1=”TASK: AR Notification” ] [tab id=1]AR Notification A1: Variable Set [ Name:%count To:%aapar(#) Recurse Variables:Off Do Maths:Off Append:Off ] A2: For [ Variable:%temp Items:%aapar() ] A3: Variable Search Replace [ Variable:%temp Search:\. Ignore Case:Off Multi-Line:Off One Match Only:Off Store Matches In: Replace Matches:On Replace With: ] A4: Array Push [ Variable Array:%aanpar Position:%count Value:%temp Fill Spaces:Off ] A5: Variable Add [ Name:%count Value:1 Wrap Around:0 ] A6: End For[/tab] [/tabs]
Back to our initial formatting, there are things to take note of: icon paths are backed into the notification, therefore all I have to pass is the icon name which is the file name itself. Make sure to create the correct folder structure. (all my icons have an icon folder inside the Tasker folder)
I’m usually using the %aapar data as my AutoRemote event filter to trigger the task. If you use the upper case filter for AutoRemote event it makes even easier to capture a specific event and use further elements of the %aapar() array to run separate actions:
[tabs tab1=”PROFILE: Perfect AutoNotification” ] [tab id=1]Profile: NearPerfect Autonotification Event: AutoRemote [ Configuration:NOTIFICATION ] Enter: AR Notification A1: AutoNotification [ Configuration:Title: %aacomm1 Text: %aacomm2 Icon: /storage/icons/%aacomm7.png Status Bar Icon Manual: /storage/icons/%aacomm6.png Status Bar Text Size: 16 Background Color: %aacomm4 Colorize Background: true Id: %aacomm3 Title Expanded: %aacomm1 Text Expanded: %aacomm2 Button 1: %aacomm9 Label 1: %aacomm8 Button 2: %aacomm11 Label 2: %aacomm10 Timeout (Seconds):20 ] If [ %aapar2 ~ silent ] A2: AutoNotification [ Configuration:Title: %aacomm1 Text: %aacomm2 Icon: /storage/icons/%aacomm7.png Status Bar Icon Manual: /storage/icons/%aacomm6.png Status Bar Text Size: 16 Background Color: %aacomm4 Colorize Background: true Id: %aacomm3 Title Expanded: %aacomm1 Text Expanded: %aacomm2 Button 1: %aacomm9 Label 1: %aacomm8 Button 2: %aacomm11 Label 2: %aacomm10 Timeout (Seconds):20 ] If [ %aapar2 ~ loud ] A3: AutoNotification [ Configuration:Title: %aacomm1 Text: %aacomm2 Icon: /storage/icons/%aacomm7.png Status Bar Icon Manual: /storage/icons/%aacomm6.png Status Bar Text Size: 16 Background Color: %aacomm4 Colorize Background: true Id: %aacomm3 Title Expanded: %aacomm1 Text Expanded: %aacomm2 Button 1: %aacomm9 Label 1: %aacomm8 Button 2: %aacomm11 Label 2: %aacomm10 Timeout (Seconds):20 ] If [ %aapar2 ~ vibrate ][/tab] [/tabs]
Conclusion
As you can see, this could save you a lot of time. It’s especially useful if you (like me) use AutoRemote a lot. You can create push notifications with different colours, icons texts and titles just by passing a string of characters. It will save you time and will also decrease the number of actions in your Tasker projects. You can find the link to the files to download in the description of the video.
A lot of time and effort goes into researching, prototyping projects and creating articles. All that knowledge has been nicely compressed into a few minutes long article and sometimes a video. If you want to put a monetary value on the time I saved you – Take a look at Patreon page! I appreciate your support!
